anyproxy
A fully configurable proxy in NodeJS, which can handle HTTPS requests perfectly.
wiki - 代理服务器的新轮子 ,介绍我们为什么要再造一个代理服务器,anyproxy与众不同的结构与功能。

Feature
- work as http or https proxy
- fully configurable, you can modify a request at any stage by your own javascript code
- when working as https proxy, it can generate and intercept https requests for any domain without complaint by browser (after you trust its root CA)
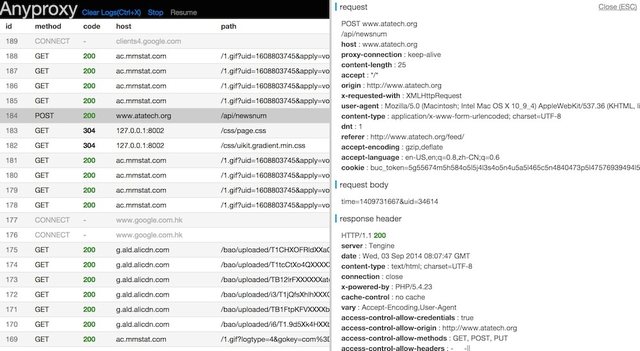
- a web interface is availabe for you to view request details
- (beta)a web UI interface for you to replace some remote response with local data
- (Chinese in this doc is nothing but translation of some key points. Be relax if you dont understand.)
Usage
step 1 - install
- install NodeJS
npm install -g anyproxy, may requiresudo- python is optional, it will be OK if you get some error about it during installing.
step 2 - start server
- start with default settings :
anyproxy - start with a specific port:
anyproxy --port 8001 - start with a rule file:
anyproxy --rule ./rule_sample/rule_allow_CORS.js
step 3 - launch web interface
- visit http://127.0.0.1:8002 with modern browsers
Rule module
-
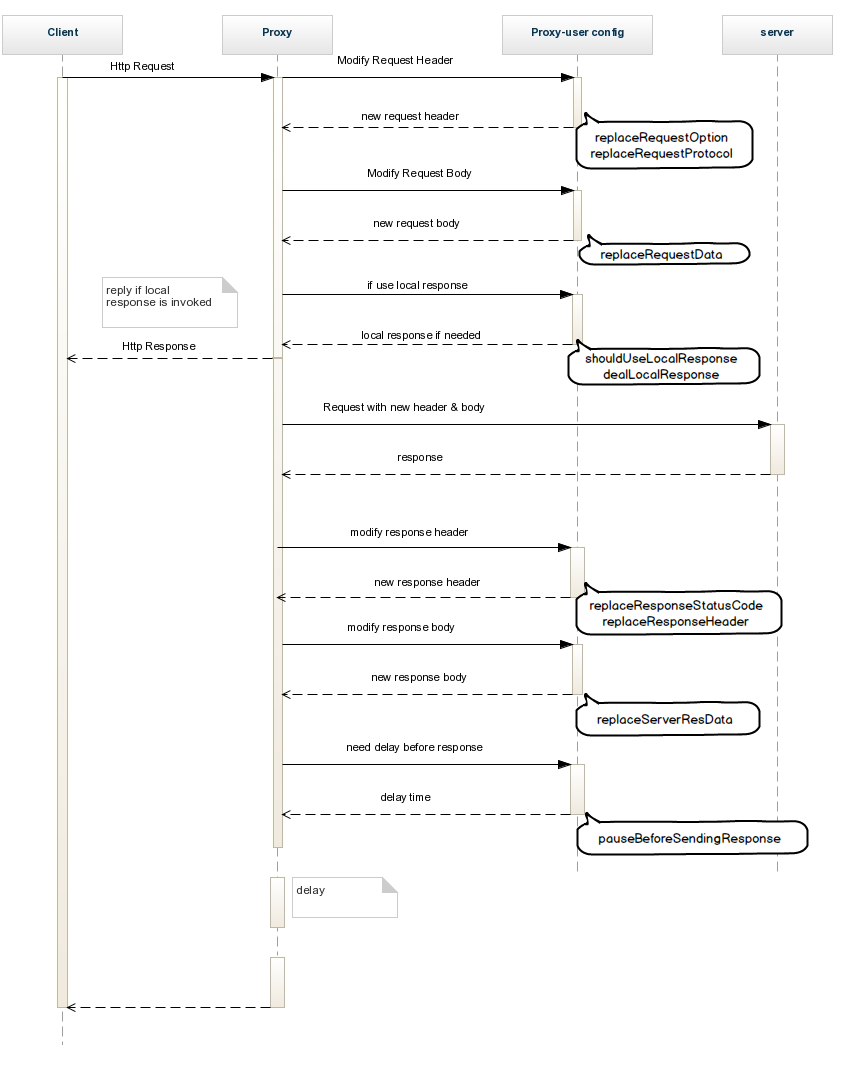
Rule module is the specialty for anyproxy. Unlike other proxy, here you could write your own code to hack requests at any stage, no matter it is about to response or the proxy just gets the request. In this way, it would be much more flexible to meet your own demands.
-
It's highly recommended to read this guide before using: What is rule file and how to write one ?
-
An entire scheme of rule file could be found at ./rule_sample/rule__blank.js. Besides, there are some samples at ./rule_sample. That may help you a lot when writing your own rule files.
Https features
After configuring rootCA, anyproxy could help to decrypt https requests, whose approach is also called Man-In-The-Middle(MITM).
step 1 - install openssl
- openssl is availabe here : http://wiki.openssl.org/index.php/Compilation_and_Installation
- using
openssl version -ato make sure it is accessible via you command line.
step 2 - generate a rootCA and trust it
- you should do this when it is the first time to start anyproxy
- execute
sudo anyproxy --root,follow the instructions on screen - [important!]you will see some tip like *rootCA generated at : ~/.anyproxy_certs... .
cdto that directory, add/trust the rootCA.crt file to your system keychain. In OSX, you may do that by open the .crt file directly - when debug https requests, you have to trust this rootCA on all of your clients.
to intercept(decrypt) https requests
- start your anyproxy as normal. When rootCA is generated, it will intercept all the https requests for you automatically.
- if you get a warning like 'unsafe connection', please check if the root CA is correctly trusted .
to start an https proxy
anyproxy --type https --host my.domain.com- the param
hostis required with https proxy and it should be kept exactly what it it when you config your browser. Otherwise, you may get some warning about security. - using https proxy means your request towards proxy will be encrypted. Please notice that this feature has nothing to do with intercept https requests.
about certs
- root certs and temperary certs are stored at
path.join(util.getUserHome(),"/.anyproxy_certs/") - to get the rootCA.crt file , you may either find it in local dir or download it via anyproxy web interface
- to clear all the temperary certificates
anyproxy --clear - https features may be unstable in windows
Others
to save request data
- to save request data to local file, use
anyproxy --file /path/to/file - anyproxy uses nedb to save request data. Since NeDB's persistence uses an append-only format, you may get some redundant record in local file. For those dupplicated ones with the same id, just use the lastest line of record.
- TrafficeRecorder is another tool based on anyproxy to help recording all requests. You may have a try.
throttling
- for instance,
anyproxy --throttle 10sets the speed limit to 10kb/s (kbyte/sec) - this is just a rough throttling for downstream, not for network simulation
work as a module for nodejs
- use it as a module and develop your own proxy.
npm install anyproxy --save
var proxy = require("anyproxy");

//create cert when you want to use https features
//please manually trust this rootCA when it is the first time you run it
!proxy.isRootCAFileExists() && proxy.generateRootCA();

var options = {
    type          : "http",
    port          : 8001,
    hostname      : "localhost",
    rule          : require("path/to/my/ruleModule.js"),
    dbFile        : null,  // optional, save request data to a specified file, will use in-memory db if not specified
    webPort       : 8002,  // optional, port for web interface
    socketPort    : 8003,  // optional, internal port for web socket, replace this when it is conflict with your own service
    webConfigPort : 8088,  // optional, internal port for web config(beta), replace this when it is conflict with your own service
    throttle      : 10,    // optional, speed limit in kb/s
    disableWebInterface : false //optional, set it when you don't want to use the web interface
};
new proxy.proxyServer(options);
Contact
- Please feel free to raise issue, or give us some advice. :)
- anyproxy用户旺旺群:1203077233
License
- Apache License, Version 2.0