AnyProxy
===================
> 本文档的适用范围是AnyProxy 4.0,欢迎提供反馈
Ref: [English Doc](../en)
AnyProxy是一个开放式的HTTP代理服务器。
Github主页:https://github.com/alibaba/anyproxy
主要特性包括:
* 基于Node.js,开放二次开发能力,允许自定义请求处理逻辑
* 支持Https的解析
* 提供GUI界面,用以观察请求
相比3.x版本,AnyProxy 4.0的主要变化:
* 规则文件(Rule)全面支持Promise和Generator
* 简化了规则文件内的接口
* Web版界面重构
 # 快速开始
## 作为全局模块
### 安装
对于Debian或者Ubuntu系统,在安装AnyProxy之前,可能还需要安装 `nodejs-legacy`
```bash
sudo apt-get install nodejs-legacy
```
然后,安装AnyProxy
```bash
npm install -g anyproxy
```
### 启动
* 命令行启动AnyProxy,默认端口号8001
```bash
anyproxy
```
* 启动后将终端http代理服务器配置为127.0.0.1:8001即可
* 访问http://127.0.0.1:8002 ,web界面上能看到所有的请求信息
### 其他命令
* 配置启动端口,如1080端口启动
```bash
anyproxy --port 1080
```
## 作为npm模块使用
AnyProxy可以作为一个npm模块使用,整合进其他工具。
> 如要启用https解析,请在代理服务器启动前自行调用`AnyProxy.utils.certMgr`相关方法生成证书,并引导用户信任安装。或引导用户使用`anyproxy-ca`方法。
* 引入
```bash
npm i anyproxy --save
```
* 使用举例
```js
const AnyProxy = require('anyproxy');
const options = {
port: 8001,
rule: require('myRuleModule'),
webInterface: {
enable: true,
webPort: 8002,
wsPort: 8003,
},
throttle: 10000,
forceProxyHttps: false,
silent: false
};
const proxyServer = new AnyProxy.ProxyServer(options);
proxyServer.on('ready', () => { /* */ });
proxyServer.on('error', (e) => { /* */ });
proxyServer.start();
//when finished
proxyServer.close();
```
* Class: AnyProxy.proxyServer
* 创建代理服务器
```js
const proxy = new AnyProxy.proxyServer(options)
```
* `options`
* `port` {number} 必选,代理服务器端口
* `rule` {object} 自定义规则模块
* `throttle` {number} 限速值,单位kb/s,默认不限速
* `forceProxyHttps` {boolean} 是否强制拦截所有的https,忽略规则模块的返回,默认`false`
* `silent` {boolean} 是否屏蔽所有console输出,默认`false`
* `dangerouslyIgnoreUnauthorized` {boolean} 是否忽略请求中的证书错误,默认`false`
* `webInterface` {object} web版界面配置
* `enable` {boolean} 是否启用web版界面,默认`false`
* `webPort` {number} web版界面端口号,默认`8002`
* Event: `ready`
* 代理服务器启动完成
* 示例
```js
proxy.on('ready', function() { })
```
* Event: `error`
* 代理服务器发生错误
* 示例
```js
proxy.on('error', function() { })
```
* Method: `start`
* 启动代理服务器
* 示例
```js
proxy.start();
```
* Method: `close`
* 关闭代理服务器
* 示例
```js
proxy.close();
```
* AnyProxy.utils.systemProxyMgr
* 管理系统的全局代理配置,方法调用时可能会弹出密码框
* 使用示例
```js
// 配置127.0.0.1:8001为全局http代理服务器
AnyProxy.utils.systemProxyMgr.enableGlobalProxy('127.0.0.1', '8001');
// 关闭全局代理服务器
AnyProxy.utils.systemProxyMgr.disableGlobalProxy();
```
* AnyProxy.utils.certMgr
* 管理AnyProxy的证书
* `AnyProxy.utils.certMgr.ifRootCAFileExists()`
* 校验系统内是否存在AnyProxy的根证书
* `AnyProxy.utils.certMgr.generateRootCA(callback)`
* 生成AnyProxy的rootCA,完成后请引导用户信任.crt文件
* 样例
```js
const AnyProxy = require('AnyProxy');
const exec = require('child_process').exec;
if (!AnyProxy.utils.certMgr.ifRootCAFileExists()) {
AnyProxy.utils.certMgr.generateRootCA((error, keyPath) => {
// let users to trust this CA before using proxy
if (!error) {
const certDir = require('path').dirname(keyPath);
console.log('The cert is generated at', certDir);
const isWin = /^win/.test(process.platform);
if (isWin) {
exec('start .', { cwd: certDir });
} else {
exec('open .', { cwd: certDir });
}
} else {
console.error('error when generating rootCA', error);
}
});
}
```
# 代理HTTPS
* AnyProxy默认不对https请求做处理,如需看到明文信息,需要配置CA证书
> 解析https请求的原理是中间人攻击(man-in-the-middle),用户必须信任AnyProxy生成的CA证书,才能进行后续流程
* 生成证书并解析所有https请求
```bash
anyproxy-ca #生成rootCA证书,生成后需要手动信任
anyproxy --intercept #启动AnyProxy,并解析所有https请求
```
* [附录:如何信任CA证书](#证书配置)
# rule模块
AnyProxy提供了二次开发的能力,你可以用js编写自己的规则模块(rule),来自定义网络请求的处理逻辑。
>注意:引用规则前,请务必确保文件来源可靠,以免发生安全问题
规则模块的能力范围包括:
* 拦截并修改正在发送的请求
* 可修改内容包括请求头(request header),请求体(request body),甚至是请求的目标地址等
* 拦截并修改服务端响应
* 可修改的内容包括http状态码(status code)、响应头(response header)、响应内容等
* 拦截https请求,对内容做修改
* 本质是中间人攻击(man-in-the-middle attack),需要客户端提前信任AnyProxy生成的CA
### 开发示例
* 举例
* 需要编写一个规则模块,在 GET http://httpbin.org/user-agent 的返回值里加上测试信息,并延迟5秒返回
* Step 1,编写规则
```js
// file: sample.js
module.exports = {
summary: 'a rule to hack response',
*beforeSendResponse(requestDetail, responseDetail) {
if (requestDetail.url === 'http://httpbin.org/user-agent') {
const newResponse = responseDetail.response;
newResponse.body += '- AnyProxy Hacked!';
return new Promise((resolve, reject) => {
setTimeout(() => { // delay
resolve({ response: newResponse });
}, 5000);
});
}
},
};
```
* Step 2, 启动AnyProxy,加载规则
* 运行 `anyproxy --rule sample.js`
* Step 3, 测试规则
* 用curl测试
```bash
curl http://httpbin.org/user-agent --proxy http://127.0.0.1:8001
```
* 用浏览器测试:配置浏览器http代理为 127.0.0.1:8001,访问 http://httpbin.org/user-agent
* 经过代理服务器后,期望的返回如下
```
{
"user-agent": "curl/7.43.0"
}
- AnyProxy Hacked!
```
* Step 4, 查看请求信息
* 浏览器访问http://127.0.0.1:8002 ,界面上能看到刚才的请求信息
### 处理流程
* 处理流程图如下
# 快速开始
## 作为全局模块
### 安装
对于Debian或者Ubuntu系统,在安装AnyProxy之前,可能还需要安装 `nodejs-legacy`
```bash
sudo apt-get install nodejs-legacy
```
然后,安装AnyProxy
```bash
npm install -g anyproxy
```
### 启动
* 命令行启动AnyProxy,默认端口号8001
```bash
anyproxy
```
* 启动后将终端http代理服务器配置为127.0.0.1:8001即可
* 访问http://127.0.0.1:8002 ,web界面上能看到所有的请求信息
### 其他命令
* 配置启动端口,如1080端口启动
```bash
anyproxy --port 1080
```
## 作为npm模块使用
AnyProxy可以作为一个npm模块使用,整合进其他工具。
> 如要启用https解析,请在代理服务器启动前自行调用`AnyProxy.utils.certMgr`相关方法生成证书,并引导用户信任安装。或引导用户使用`anyproxy-ca`方法。
* 引入
```bash
npm i anyproxy --save
```
* 使用举例
```js
const AnyProxy = require('anyproxy');
const options = {
port: 8001,
rule: require('myRuleModule'),
webInterface: {
enable: true,
webPort: 8002,
wsPort: 8003,
},
throttle: 10000,
forceProxyHttps: false,
silent: false
};
const proxyServer = new AnyProxy.ProxyServer(options);
proxyServer.on('ready', () => { /* */ });
proxyServer.on('error', (e) => { /* */ });
proxyServer.start();
//when finished
proxyServer.close();
```
* Class: AnyProxy.proxyServer
* 创建代理服务器
```js
const proxy = new AnyProxy.proxyServer(options)
```
* `options`
* `port` {number} 必选,代理服务器端口
* `rule` {object} 自定义规则模块
* `throttle` {number} 限速值,单位kb/s,默认不限速
* `forceProxyHttps` {boolean} 是否强制拦截所有的https,忽略规则模块的返回,默认`false`
* `silent` {boolean} 是否屏蔽所有console输出,默认`false`
* `dangerouslyIgnoreUnauthorized` {boolean} 是否忽略请求中的证书错误,默认`false`
* `webInterface` {object} web版界面配置
* `enable` {boolean} 是否启用web版界面,默认`false`
* `webPort` {number} web版界面端口号,默认`8002`
* Event: `ready`
* 代理服务器启动完成
* 示例
```js
proxy.on('ready', function() { })
```
* Event: `error`
* 代理服务器发生错误
* 示例
```js
proxy.on('error', function() { })
```
* Method: `start`
* 启动代理服务器
* 示例
```js
proxy.start();
```
* Method: `close`
* 关闭代理服务器
* 示例
```js
proxy.close();
```
* AnyProxy.utils.systemProxyMgr
* 管理系统的全局代理配置,方法调用时可能会弹出密码框
* 使用示例
```js
// 配置127.0.0.1:8001为全局http代理服务器
AnyProxy.utils.systemProxyMgr.enableGlobalProxy('127.0.0.1', '8001');
// 关闭全局代理服务器
AnyProxy.utils.systemProxyMgr.disableGlobalProxy();
```
* AnyProxy.utils.certMgr
* 管理AnyProxy的证书
* `AnyProxy.utils.certMgr.ifRootCAFileExists()`
* 校验系统内是否存在AnyProxy的根证书
* `AnyProxy.utils.certMgr.generateRootCA(callback)`
* 生成AnyProxy的rootCA,完成后请引导用户信任.crt文件
* 样例
```js
const AnyProxy = require('AnyProxy');
const exec = require('child_process').exec;
if (!AnyProxy.utils.certMgr.ifRootCAFileExists()) {
AnyProxy.utils.certMgr.generateRootCA((error, keyPath) => {
// let users to trust this CA before using proxy
if (!error) {
const certDir = require('path').dirname(keyPath);
console.log('The cert is generated at', certDir);
const isWin = /^win/.test(process.platform);
if (isWin) {
exec('start .', { cwd: certDir });
} else {
exec('open .', { cwd: certDir });
}
} else {
console.error('error when generating rootCA', error);
}
});
}
```
# 代理HTTPS
* AnyProxy默认不对https请求做处理,如需看到明文信息,需要配置CA证书
> 解析https请求的原理是中间人攻击(man-in-the-middle),用户必须信任AnyProxy生成的CA证书,才能进行后续流程
* 生成证书并解析所有https请求
```bash
anyproxy-ca #生成rootCA证书,生成后需要手动信任
anyproxy --intercept #启动AnyProxy,并解析所有https请求
```
* [附录:如何信任CA证书](#证书配置)
# rule模块
AnyProxy提供了二次开发的能力,你可以用js编写自己的规则模块(rule),来自定义网络请求的处理逻辑。
>注意:引用规则前,请务必确保文件来源可靠,以免发生安全问题
规则模块的能力范围包括:
* 拦截并修改正在发送的请求
* 可修改内容包括请求头(request header),请求体(request body),甚至是请求的目标地址等
* 拦截并修改服务端响应
* 可修改的内容包括http状态码(status code)、响应头(response header)、响应内容等
* 拦截https请求,对内容做修改
* 本质是中间人攻击(man-in-the-middle attack),需要客户端提前信任AnyProxy生成的CA
### 开发示例
* 举例
* 需要编写一个规则模块,在 GET http://httpbin.org/user-agent 的返回值里加上测试信息,并延迟5秒返回
* Step 1,编写规则
```js
// file: sample.js
module.exports = {
summary: 'a rule to hack response',
*beforeSendResponse(requestDetail, responseDetail) {
if (requestDetail.url === 'http://httpbin.org/user-agent') {
const newResponse = responseDetail.response;
newResponse.body += '- AnyProxy Hacked!';
return new Promise((resolve, reject) => {
setTimeout(() => { // delay
resolve({ response: newResponse });
}, 5000);
});
}
},
};
```
* Step 2, 启动AnyProxy,加载规则
* 运行 `anyproxy --rule sample.js`
* Step 3, 测试规则
* 用curl测试
```bash
curl http://httpbin.org/user-agent --proxy http://127.0.0.1:8001
```
* 用浏览器测试:配置浏览器http代理为 127.0.0.1:8001,访问 http://httpbin.org/user-agent
* 经过代理服务器后,期望的返回如下
```
{
"user-agent": "curl/7.43.0"
}
- AnyProxy Hacked!
```
* Step 4, 查看请求信息
* 浏览器访问http://127.0.0.1:8002 ,界面上能看到刚才的请求信息
### 处理流程
* 处理流程图如下
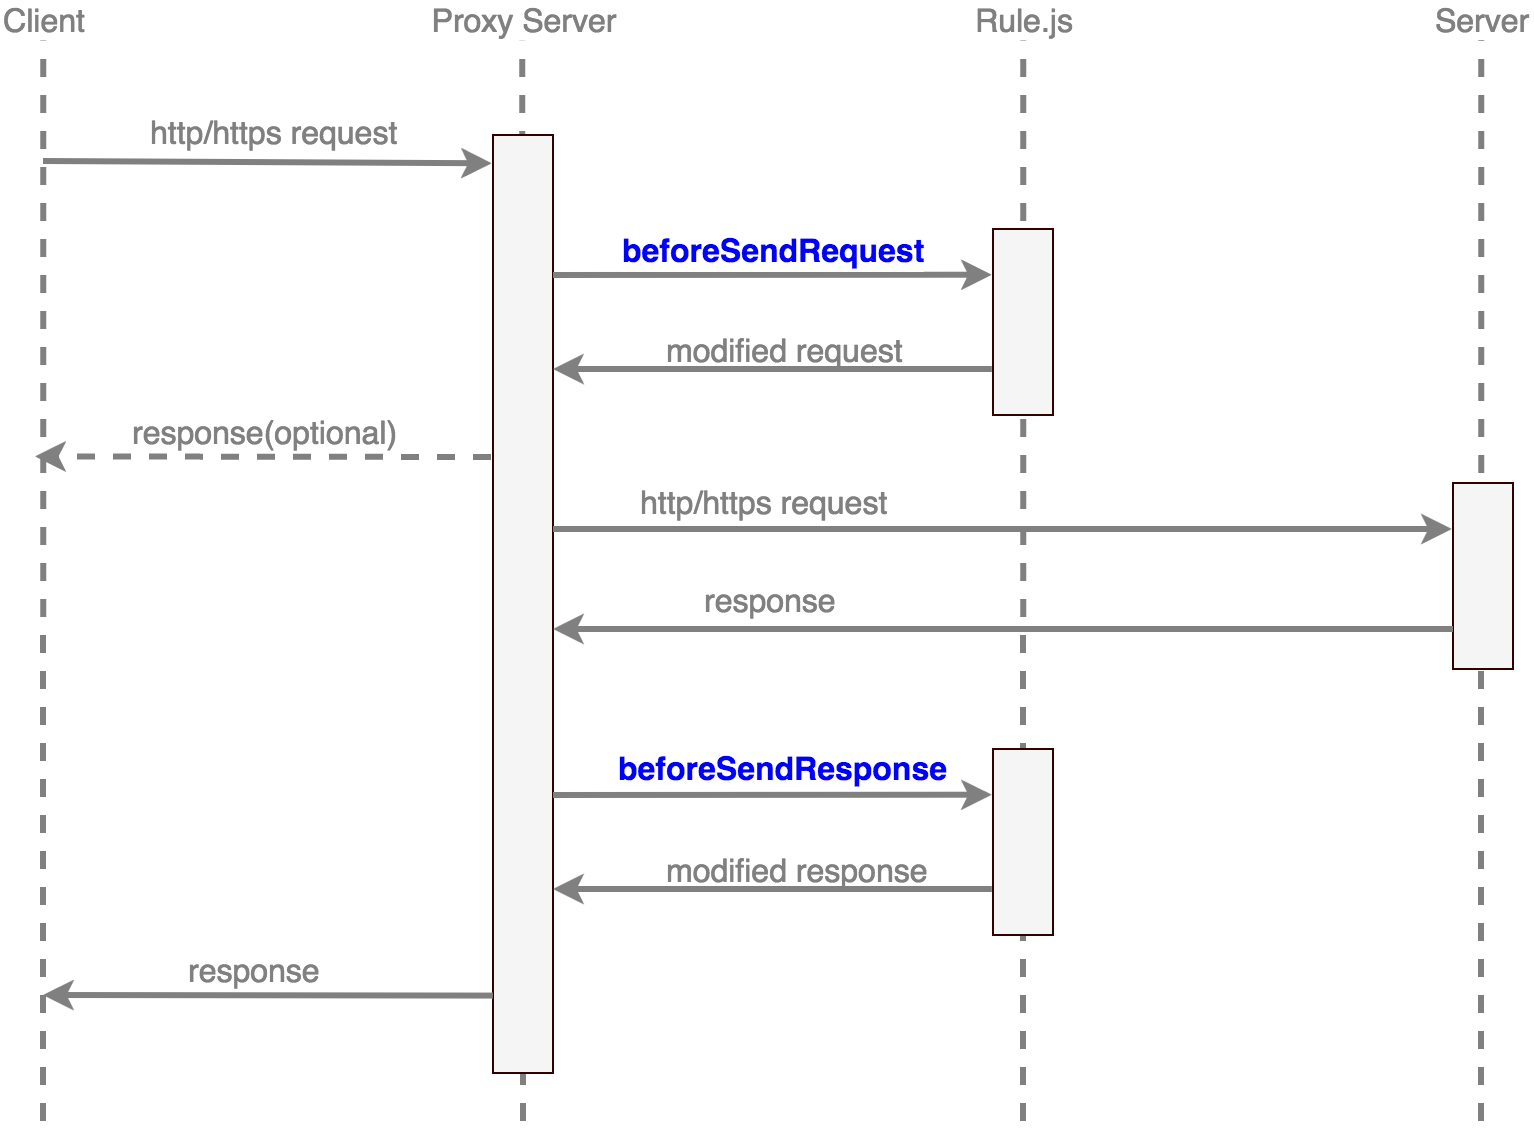 * 当http请求经过代理服务器时,具体处理过程是:
* 收集请求所有请求参数,包括method, header, body等
* AnyProxy调用规则模块`beforeSendRequest`方法,由模块做处理,返回新的请求参数,或返回响应内容
* 如果`beforeSendRequest`返回了响应内容,则立即把此响应返回到客户端(而不再发送到真正的服务端),流程结束。
* 根据请求参数,向服务端发出请求,接收服务端响应。
* 调用规则模块`beforeSendResponse`方法,由模块对响应内容进行处理
* 把响应信息返回给客户端
* 当代理服务器收到https请求时,AnyProxy可以替换证书,对请求做明文解析。
* 调用规则模块`beforeDealHttpsRequest`方法,如果返回`true`,会明文解析这个请求,其他请求不处理
* 被明文解析后的https请求,处理流程同http一致。未明文解析请求不会再进入规则模块做处理。
### 如何引用
如下几种方案都可以用来引用规则模块:
* 使用本地路径
```bash
anyproxy --rule ./rule.js
```
* 使用在线地址
```bash
anyproxy --rule https://sample.com/rule.js
```
* 使用npm包
* AnyProxy使用`require()`加载本地规则,你可以在参数里传入一个本地的npm包路径,或是某个全局安装的npm包
```bash
anyproxy --rule ./myRulePkg/ #本地包
npm i -g myRulePkg && anyproxy --rule myRulePkg #全局包
```
# rule接口文档
规则模块应该符合cmd规范,一个典型的规则模块代码结构如下。模块中所有方法都是可选的,只需实现业务感兴趣的部分即可。
```js
module.exports = {
// 模块介绍
summary: 'my customized rule for AnyProxy',
// 发送请求前拦截处理
*beforeSendRequest(requestDetail) { /* ... */ },
// 发送响应前处理
*beforeSendResponse(requestDetail, responseDetail) { /* ... */ },
// 是否处理https请求
*beforeDealHttpsRequest(requestDetail) { /* ... */ },
// 请求出错的事件
*onError(requestDetail, error) { /* ... */ },
// https连接服务器出错
*onConnectError(requestDetail, error) { /* ... */ }
};
```
> 规则文件中,除了summary,都是由 [co](https://www.npmjs.com/package/co) 驱动的,函数需要满足yieldable。可以返回promise或使用generator函数。
### summary
#### summary(): string | summary:string
* 规则模块的介绍文案,用于AnyProxy提示用户, 可以是一个函数,也可以是一个普通的字符串
### beforeSendRequest
#### beforeSendRequest(requestDetail)
* AnyProxy向服务端发送请求前,会调用`beforeSendRequest`,并带上参数`requestDetail`
* `requestDetail`
* `protocol` {string} 请求使用的协议,http或者https
* `requestOptions` {object} 即将发送的请求配置,供require('http').request作为使用。详见:https://nodejs.org/api/http.html#http_http_request_options_callback
* `requestData` {object} 请求Body
* `url` {string} 请求url
* `_req` {object} 请求的原始request
* 举例:请求 *anyproxy.io* 时,`requestDetail`参数内容大致如下
```js
{
protocol: 'http',
url: 'http://anyproxy.io/',
requestOptions: {
hostname: 'anyproxy.io',
port: 80,
path: '/',
method: 'GET',
headers: {
Host: 'anyproxy.io',
'Proxy-Connection': 'keep-alive',
'User-Agent': '...'
}
},
requestData: '...',
_req: { /* ... */}
}
```
* 以下几种返回都是合法的
* 不做任何处理,返回null
```js
return null;
```
* 修改请求协议,如强制改用https发起请求
```js
return {
protocol: 'https'
};
```
* 修改请求参数
```js
var newOption = Object.assign({}, requestDetail.requestOptions);
newOption.path = '/redirect/to/another/path';
return {
requestOptions: newOption
};
```
* 修改请求body
```js
return {
requestData: 'my new request data'
//这里也可以同时加上requestOptions
};
```
* 直接返回客户端,不再发起请求,其中`statusCode` `header` 是必选字段
```js
return {
response: {
statusCode: 200,
header: { 'content-type': 'text/html' },
body: 'this could be a or '
}
};
```
### beforeSendResponse
#### beforeSendResponse(requestDetail, responseDetail)
* AnyProxy向客户端发送请求前,会调用`beforeSendResponse`,并带上参数`requestDetail` `responseDetail`
* `requestDetail` 同`beforeSendRequest`中的参数
* `responseDetail`
* `response` {object} 服务端的返回信息,包括`statusCode` `header` `body`三个字段
* `_res` {object} 原始的服务端返回对象
* 举例,请求 *anyproxy.io* 时,`responseDetail`参数内容大致如下
```js
{
response: {
statusCode: 200,
header: {
'Content-Type': 'image/gif',
Connection: 'close',
'Cache-Control': '...'
},
body: '...'
},
_res: { /* ... */ }
}
```
* 以下几种返回都是合法的
* 不做任何处理,返回null
```js
return null;
```
* 修改返回的状态码
```js
var newResponse = Object.assign({}, responseDetail.response);
newResponse.statusCode = 404;
return {
response: newResponse
};
```
* 修改返回的内容
```js
var newResponse = Object.assign({}, responseDetail.response);
newResponse.body += '--from anyproxy--';
return {
response: newResponse
};
```
### beforeDealHttpsRequest
#### beforeDealHttpsRequest(requestDetail)
* AnyProxy收到https请求时,会调用`beforeDealHttpsRequest`,并带上参数`requestDetail`
* 如果配置了全局解析https的参数,则AnyProxy会略过这个调用
* 只有返回`true`时,AnyProxy才会尝试替换证书、解析https。否则只做数据流转发,无法看到明文数据。
* 注意:https over http的代理模式中,这里的request是CONNECT请求
* `requestDetail`
* `host` {string} 请求目标的Host,受制于协议,这里无法获取完整url
* `_req` {object} 请求的原始request
* 返回值
* `true`或者`false`,表示是否需要AnyProxy替换证书并解析https
### onError
#### onError(requestDetail, error)
* 在请求处理过程中发生错误时,AnyProxy会调用`onError`方法,并提供对应的错误信息
* 多数场景下,错误会在请求目标服务器的时候发生,比如DNS解析失败、请求超时等
* `requestDetail` 同`beforeSendRequest`中的参数
* 以下几种返回都是合法的
* 不做任何处理。此时AnyProxy会返回一个默认的错误页。
```js
return null;
```
* 返回自定义错误页
```js
return {
response: {
statusCode: 200,
header: { 'content-type': 'text/html' },
body: 'this could be a or '
}
};
```
### onConnectError
#### onConnectError(requestDetail, error)
* AnyProxy在与目标HTTPS服务器建立连接的过程中,如果发生错误,AnyProxy会调用这个方法
* `requestDetail` 同`beforeDealHttpsRequest`中的参数
* 此处无法控制向客户端的返回信息,无需返回值。
# rule样例
* 这里提供一些样例,来讲解规则模块的常见用法
* 你可以通过 `anyproxy --rule http://....js` 来加载模块并体验
* 用curl发请求测试的方法如下
* 直接请求服务器:`curl http://httpbin.org/`
* 通过代理服务器请求:`curl http://httpbin.org/ --proxy http://127.0.0.1:8001`
### 使用本地数据
* 拦截发送到 http://httpbin.org 的请求,使用本地数据代替服务端返回
{{sample-rule:rule_sample/sample_use_local_response.js}}
### 修改请求头
* 修改发送到 httpbin.org 的user-agent
{{sample-rule:rule_sample/sample_modify_request_header.js}}
### 修改请求数据
* 修改发送到 http://httpbin.org/post 的post数据
{{sample-rule:rule_sample/sample_modify_request_data.js}}
### 修改请求的目标地址
* 把所有发送到 http://httpbin.org/ 的请求全部改到 http://httpbin.org/user-agent
{{sample-rule:rule_sample/sample_modify_request_path.js}}
### 修改请求协议
* 把用http协议请求的 http://httpbin.org 改成https并发送
{{sample-rule:rule_sample/sample_modify_request_protocol.js}}
### 修改返回状态码
* 把 所有http://httpbin.org 的返回状态码都改成404
{{sample-rule:rule_sample/sample_modify_response_statuscode.js}}
### 修改返回头
* 在 http://httpbin.org/user-agent 的返回头里加上 X-Proxy-By:AnyProxy
{{sample-rule:rule_sample/sample_modify_response_header.js}}
### 修改返回内容并延迟
* 在 http://httpbin.org/user-agent 的返回最后追加AnyProxy的签名,并延迟5秒
{{sample-rule:rule_sample/sample_modify_response_data.js}}
# 证书配置
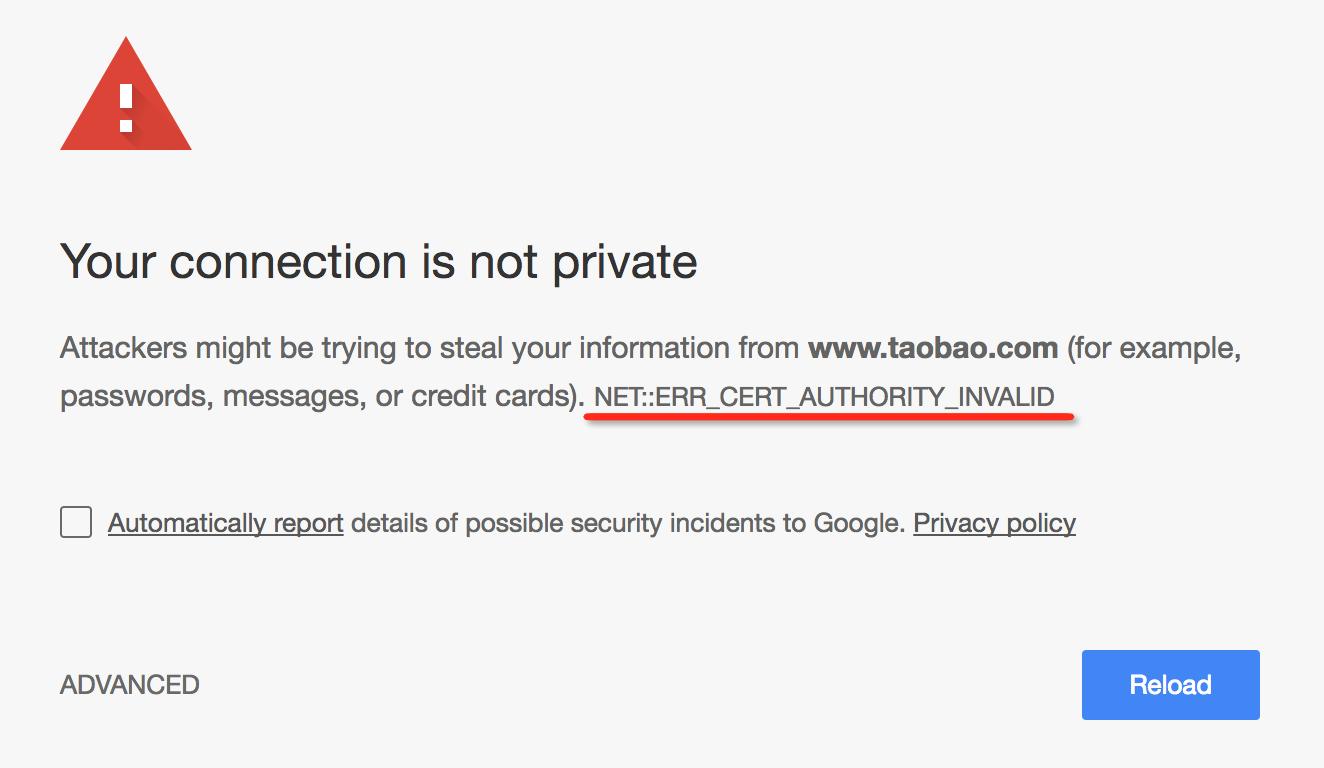
### OSX系统信任CA证书
* 类似这种报错都是因为系统没有信任AnyProxy生成的CA所造成的
* 当http请求经过代理服务器时,具体处理过程是:
* 收集请求所有请求参数,包括method, header, body等
* AnyProxy调用规则模块`beforeSendRequest`方法,由模块做处理,返回新的请求参数,或返回响应内容
* 如果`beforeSendRequest`返回了响应内容,则立即把此响应返回到客户端(而不再发送到真正的服务端),流程结束。
* 根据请求参数,向服务端发出请求,接收服务端响应。
* 调用规则模块`beforeSendResponse`方法,由模块对响应内容进行处理
* 把响应信息返回给客户端
* 当代理服务器收到https请求时,AnyProxy可以替换证书,对请求做明文解析。
* 调用规则模块`beforeDealHttpsRequest`方法,如果返回`true`,会明文解析这个请求,其他请求不处理
* 被明文解析后的https请求,处理流程同http一致。未明文解析请求不会再进入规则模块做处理。
### 如何引用
如下几种方案都可以用来引用规则模块:
* 使用本地路径
```bash
anyproxy --rule ./rule.js
```
* 使用在线地址
```bash
anyproxy --rule https://sample.com/rule.js
```
* 使用npm包
* AnyProxy使用`require()`加载本地规则,你可以在参数里传入一个本地的npm包路径,或是某个全局安装的npm包
```bash
anyproxy --rule ./myRulePkg/ #本地包
npm i -g myRulePkg && anyproxy --rule myRulePkg #全局包
```
# rule接口文档
规则模块应该符合cmd规范,一个典型的规则模块代码结构如下。模块中所有方法都是可选的,只需实现业务感兴趣的部分即可。
```js
module.exports = {
// 模块介绍
summary: 'my customized rule for AnyProxy',
// 发送请求前拦截处理
*beforeSendRequest(requestDetail) { /* ... */ },
// 发送响应前处理
*beforeSendResponse(requestDetail, responseDetail) { /* ... */ },
// 是否处理https请求
*beforeDealHttpsRequest(requestDetail) { /* ... */ },
// 请求出错的事件
*onError(requestDetail, error) { /* ... */ },
// https连接服务器出错
*onConnectError(requestDetail, error) { /* ... */ }
};
```
> 规则文件中,除了summary,都是由 [co](https://www.npmjs.com/package/co) 驱动的,函数需要满足yieldable。可以返回promise或使用generator函数。
### summary
#### summary(): string | summary:string
* 规则模块的介绍文案,用于AnyProxy提示用户, 可以是一个函数,也可以是一个普通的字符串
### beforeSendRequest
#### beforeSendRequest(requestDetail)
* AnyProxy向服务端发送请求前,会调用`beforeSendRequest`,并带上参数`requestDetail`
* `requestDetail`
* `protocol` {string} 请求使用的协议,http或者https
* `requestOptions` {object} 即将发送的请求配置,供require('http').request作为使用。详见:https://nodejs.org/api/http.html#http_http_request_options_callback
* `requestData` {object} 请求Body
* `url` {string} 请求url
* `_req` {object} 请求的原始request
* 举例:请求 *anyproxy.io* 时,`requestDetail`参数内容大致如下
```js
{
protocol: 'http',
url: 'http://anyproxy.io/',
requestOptions: {
hostname: 'anyproxy.io',
port: 80,
path: '/',
method: 'GET',
headers: {
Host: 'anyproxy.io',
'Proxy-Connection': 'keep-alive',
'User-Agent': '...'
}
},
requestData: '...',
_req: { /* ... */}
}
```
* 以下几种返回都是合法的
* 不做任何处理,返回null
```js
return null;
```
* 修改请求协议,如强制改用https发起请求
```js
return {
protocol: 'https'
};
```
* 修改请求参数
```js
var newOption = Object.assign({}, requestDetail.requestOptions);
newOption.path = '/redirect/to/another/path';
return {
requestOptions: newOption
};
```
* 修改请求body
```js
return {
requestData: 'my new request data'
//这里也可以同时加上requestOptions
};
```
* 直接返回客户端,不再发起请求,其中`statusCode` `header` 是必选字段
```js
return {
response: {
statusCode: 200,
header: { 'content-type': 'text/html' },
body: 'this could be a or '
}
};
```
### beforeSendResponse
#### beforeSendResponse(requestDetail, responseDetail)
* AnyProxy向客户端发送请求前,会调用`beforeSendResponse`,并带上参数`requestDetail` `responseDetail`
* `requestDetail` 同`beforeSendRequest`中的参数
* `responseDetail`
* `response` {object} 服务端的返回信息,包括`statusCode` `header` `body`三个字段
* `_res` {object} 原始的服务端返回对象
* 举例,请求 *anyproxy.io* 时,`responseDetail`参数内容大致如下
```js
{
response: {
statusCode: 200,
header: {
'Content-Type': 'image/gif',
Connection: 'close',
'Cache-Control': '...'
},
body: '...'
},
_res: { /* ... */ }
}
```
* 以下几种返回都是合法的
* 不做任何处理,返回null
```js
return null;
```
* 修改返回的状态码
```js
var newResponse = Object.assign({}, responseDetail.response);
newResponse.statusCode = 404;
return {
response: newResponse
};
```
* 修改返回的内容
```js
var newResponse = Object.assign({}, responseDetail.response);
newResponse.body += '--from anyproxy--';
return {
response: newResponse
};
```
### beforeDealHttpsRequest
#### beforeDealHttpsRequest(requestDetail)
* AnyProxy收到https请求时,会调用`beforeDealHttpsRequest`,并带上参数`requestDetail`
* 如果配置了全局解析https的参数,则AnyProxy会略过这个调用
* 只有返回`true`时,AnyProxy才会尝试替换证书、解析https。否则只做数据流转发,无法看到明文数据。
* 注意:https over http的代理模式中,这里的request是CONNECT请求
* `requestDetail`
* `host` {string} 请求目标的Host,受制于协议,这里无法获取完整url
* `_req` {object} 请求的原始request
* 返回值
* `true`或者`false`,表示是否需要AnyProxy替换证书并解析https
### onError
#### onError(requestDetail, error)
* 在请求处理过程中发生错误时,AnyProxy会调用`onError`方法,并提供对应的错误信息
* 多数场景下,错误会在请求目标服务器的时候发生,比如DNS解析失败、请求超时等
* `requestDetail` 同`beforeSendRequest`中的参数
* 以下几种返回都是合法的
* 不做任何处理。此时AnyProxy会返回一个默认的错误页。
```js
return null;
```
* 返回自定义错误页
```js
return {
response: {
statusCode: 200,
header: { 'content-type': 'text/html' },
body: 'this could be a or '
}
};
```
### onConnectError
#### onConnectError(requestDetail, error)
* AnyProxy在与目标HTTPS服务器建立连接的过程中,如果发生错误,AnyProxy会调用这个方法
* `requestDetail` 同`beforeDealHttpsRequest`中的参数
* 此处无法控制向客户端的返回信息,无需返回值。
# rule样例
* 这里提供一些样例,来讲解规则模块的常见用法
* 你可以通过 `anyproxy --rule http://....js` 来加载模块并体验
* 用curl发请求测试的方法如下
* 直接请求服务器:`curl http://httpbin.org/`
* 通过代理服务器请求:`curl http://httpbin.org/ --proxy http://127.0.0.1:8001`
### 使用本地数据
* 拦截发送到 http://httpbin.org 的请求,使用本地数据代替服务端返回
{{sample-rule:rule_sample/sample_use_local_response.js}}
### 修改请求头
* 修改发送到 httpbin.org 的user-agent
{{sample-rule:rule_sample/sample_modify_request_header.js}}
### 修改请求数据
* 修改发送到 http://httpbin.org/post 的post数据
{{sample-rule:rule_sample/sample_modify_request_data.js}}
### 修改请求的目标地址
* 把所有发送到 http://httpbin.org/ 的请求全部改到 http://httpbin.org/user-agent
{{sample-rule:rule_sample/sample_modify_request_path.js}}
### 修改请求协议
* 把用http协议请求的 http://httpbin.org 改成https并发送
{{sample-rule:rule_sample/sample_modify_request_protocol.js}}
### 修改返回状态码
* 把 所有http://httpbin.org 的返回状态码都改成404
{{sample-rule:rule_sample/sample_modify_response_statuscode.js}}
### 修改返回头
* 在 http://httpbin.org/user-agent 的返回头里加上 X-Proxy-By:AnyProxy
{{sample-rule:rule_sample/sample_modify_response_header.js}}
### 修改返回内容并延迟
* 在 http://httpbin.org/user-agent 的返回最后追加AnyProxy的签名,并延迟5秒
{{sample-rule:rule_sample/sample_modify_response_data.js}}
# 证书配置
### OSX系统信任CA证书
* 类似这种报错都是因为系统没有信任AnyProxy生成的CA所造成的
 > 警告:CA证书和系统安全息息相关,建议亲自生成,并妥善保管
安装CA:
* 双击打开*rootCA.crt*
* 确认将证书添加到login或system
> 警告:CA证书和系统安全息息相关,建议亲自生成,并妥善保管
安装CA:
* 双击打开*rootCA.crt*
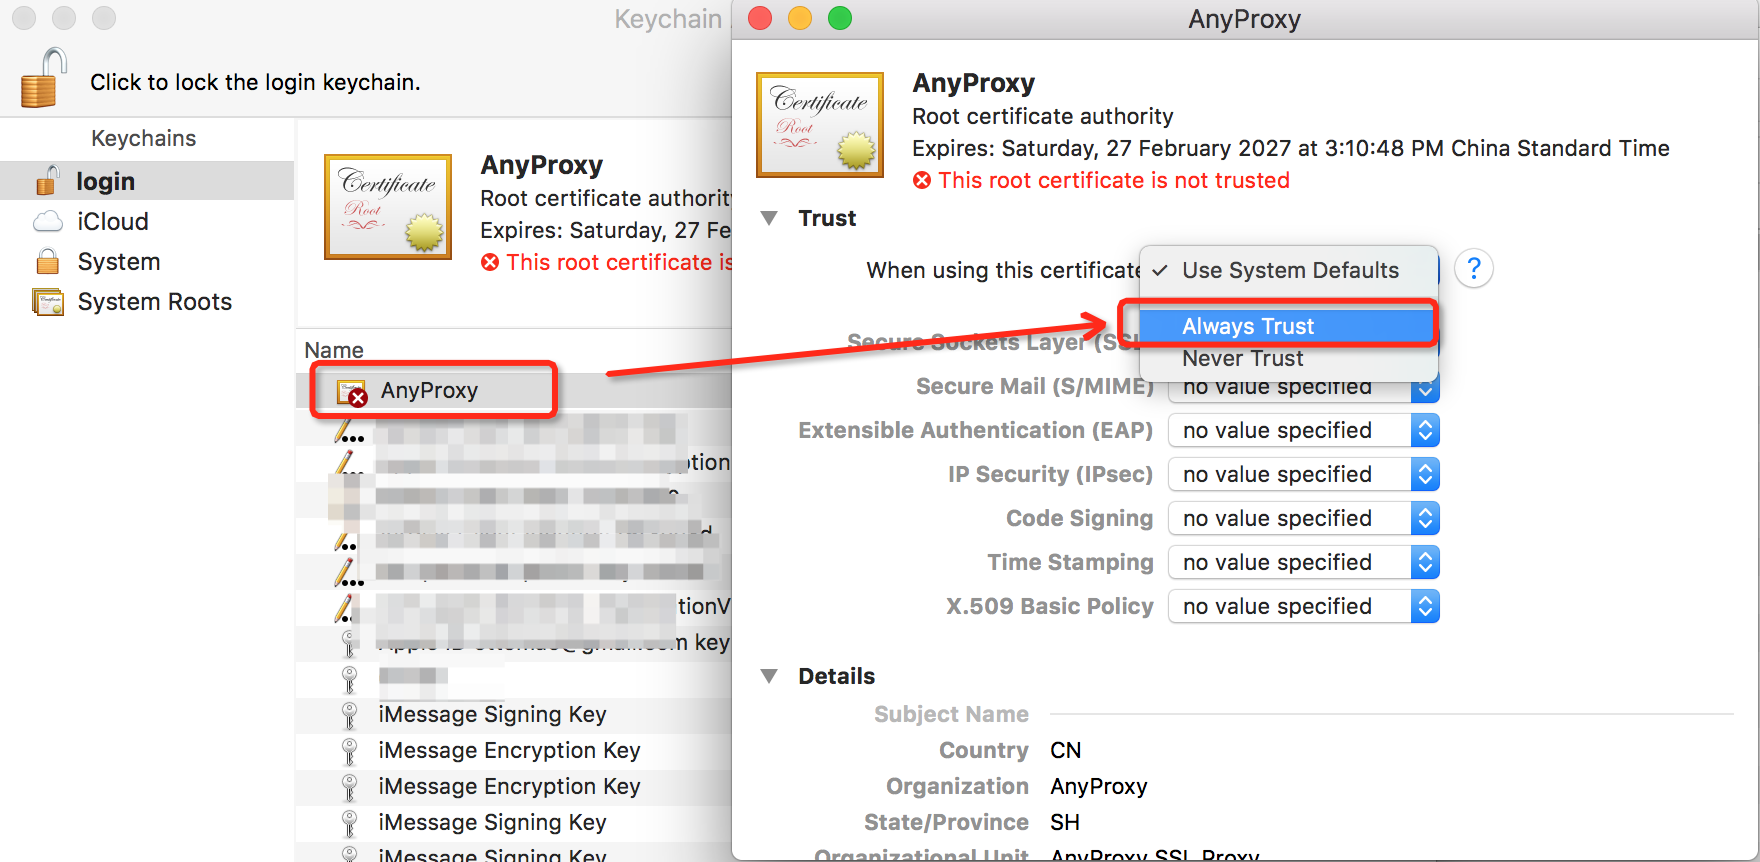
* 确认将证书添加到login或system
 * 找到刚刚导入的AnyProxy证书,配置为信任(Always Trust)
 ### Windows系统信任CA证书
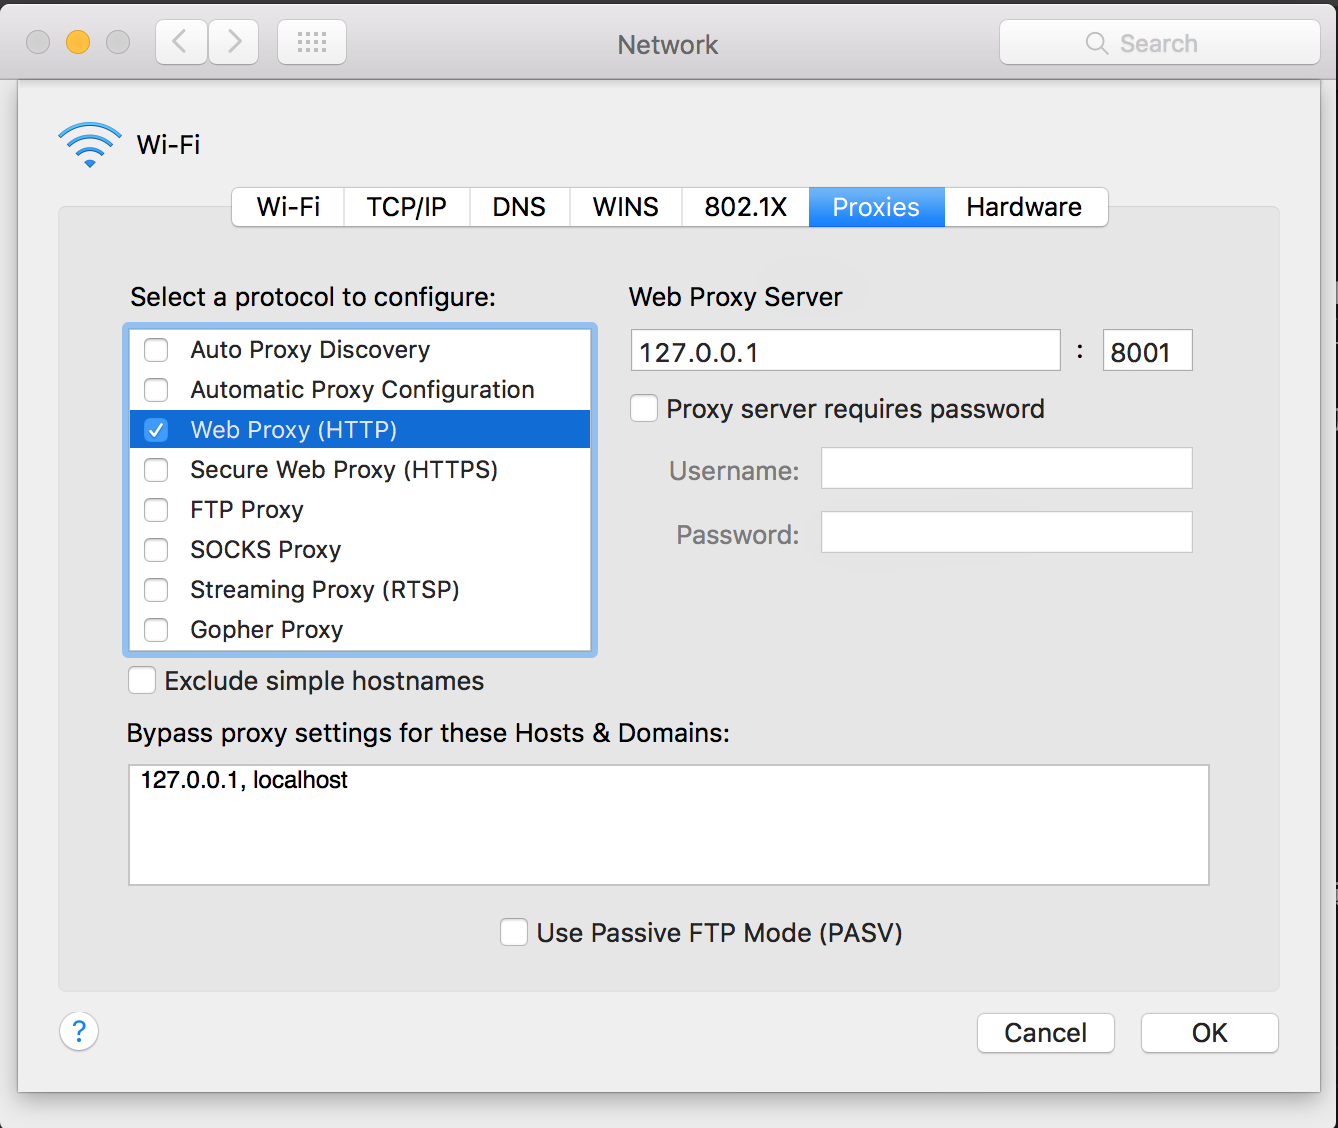
 ### 配置OSX系统代理
* 在wifi高级设置中,配置http代理即可
### 配置OSX系统代理
* 在wifi高级设置中,配置http代理即可
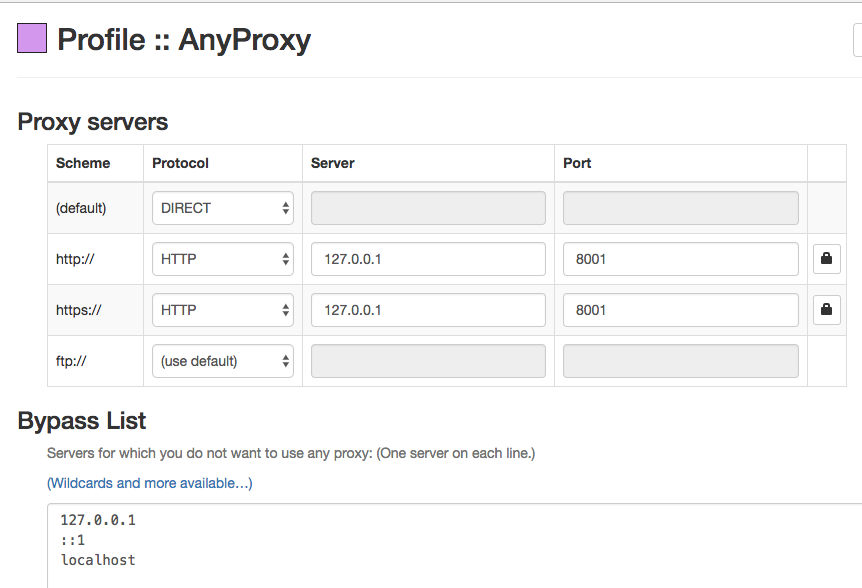
 ### 配置浏览器HTTP代理
* 以Chrome的[SwitchyOmega插件](https://chrome.google.com/webstore/detail/padekgcemlokbadohgkifijomclgjgif)为例
### 配置浏览器HTTP代理
* 以Chrome的[SwitchyOmega插件](https://chrome.google.com/webstore/detail/padekgcemlokbadohgkifijomclgjgif)为例
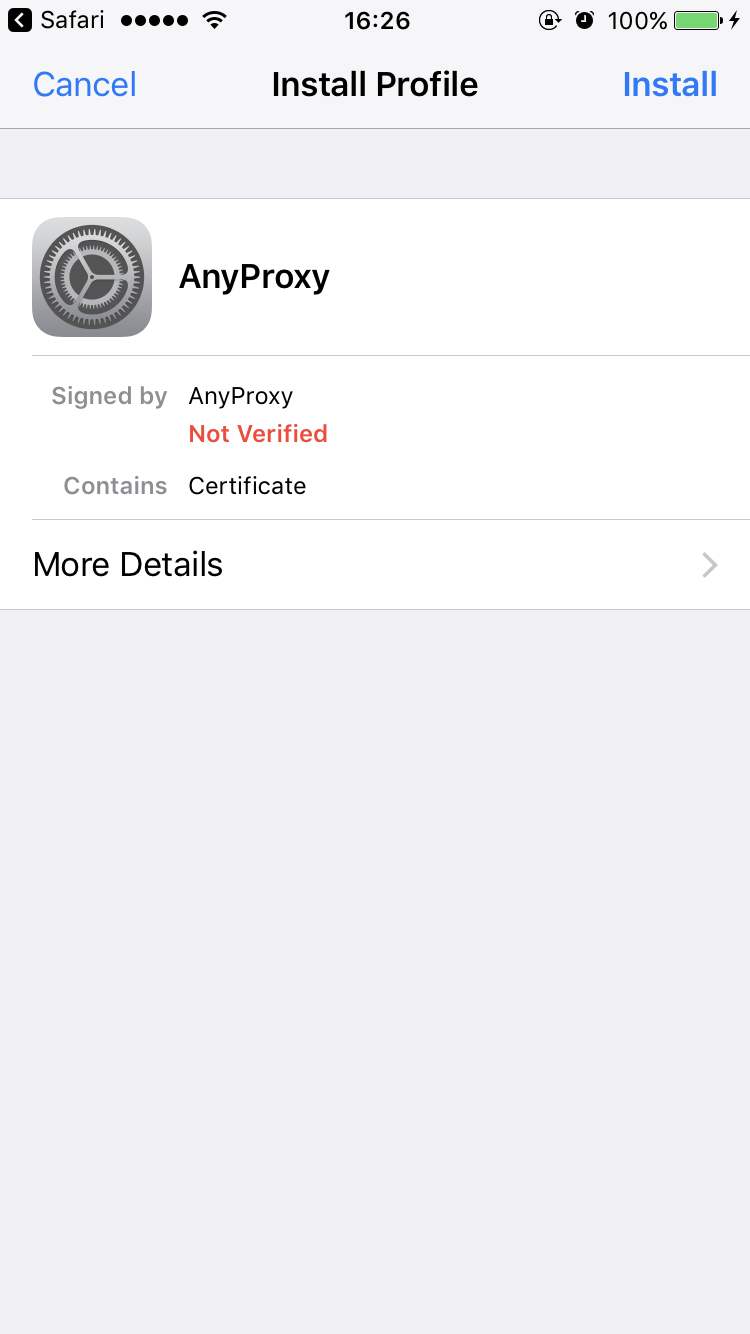
 ### iOS系统信任CA证书
* 点击web ui中的 *Root CA*,按提示扫描二维码即可安装
### iOS系统信任CA证书
* 点击web ui中的 *Root CA*,按提示扫描二维码即可安装
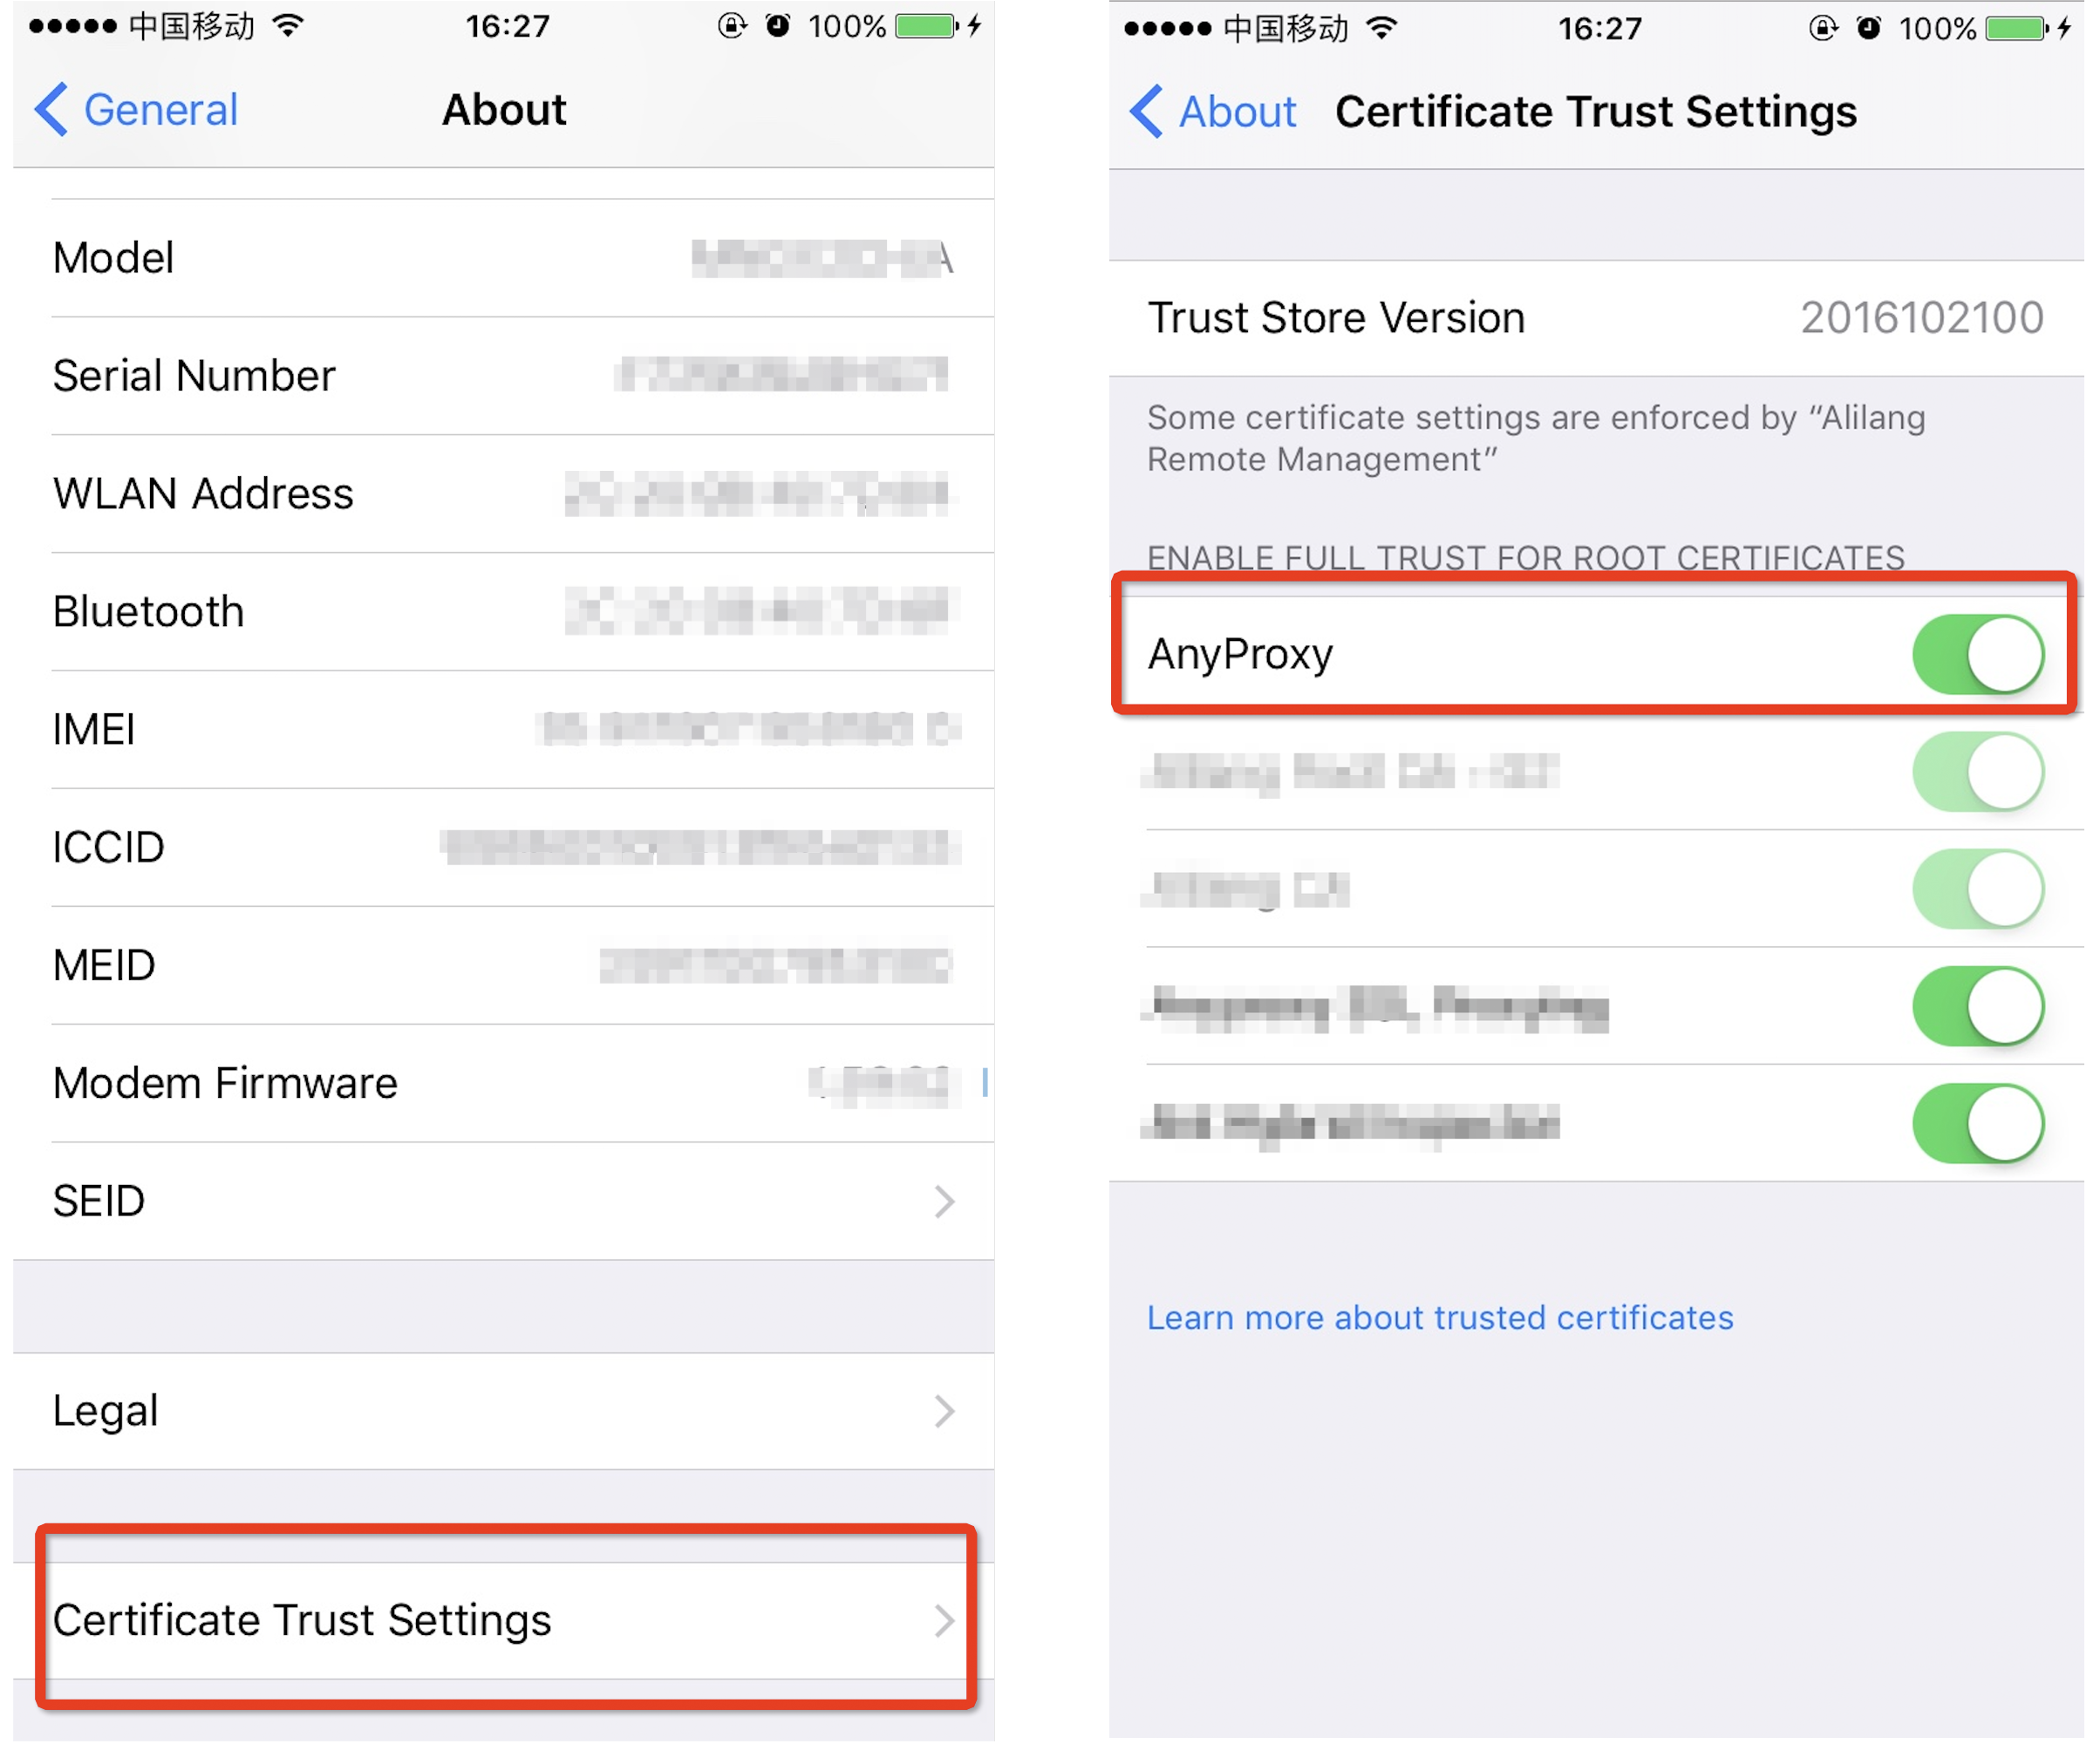
 ### iOS >= 10.3信任CA证书
* 除了上述证书安装过程,还需要在 *设置->通用->关于本机->证书信任设置* 中把AnyProxy证书的开关打开,否则safari将报错。
### iOS >= 10.3信任CA证书
* 除了上述证书安装过程,还需要在 *设置->通用->关于本机->证书信任设置* 中把AnyProxy证书的开关打开,否则safari将报错。
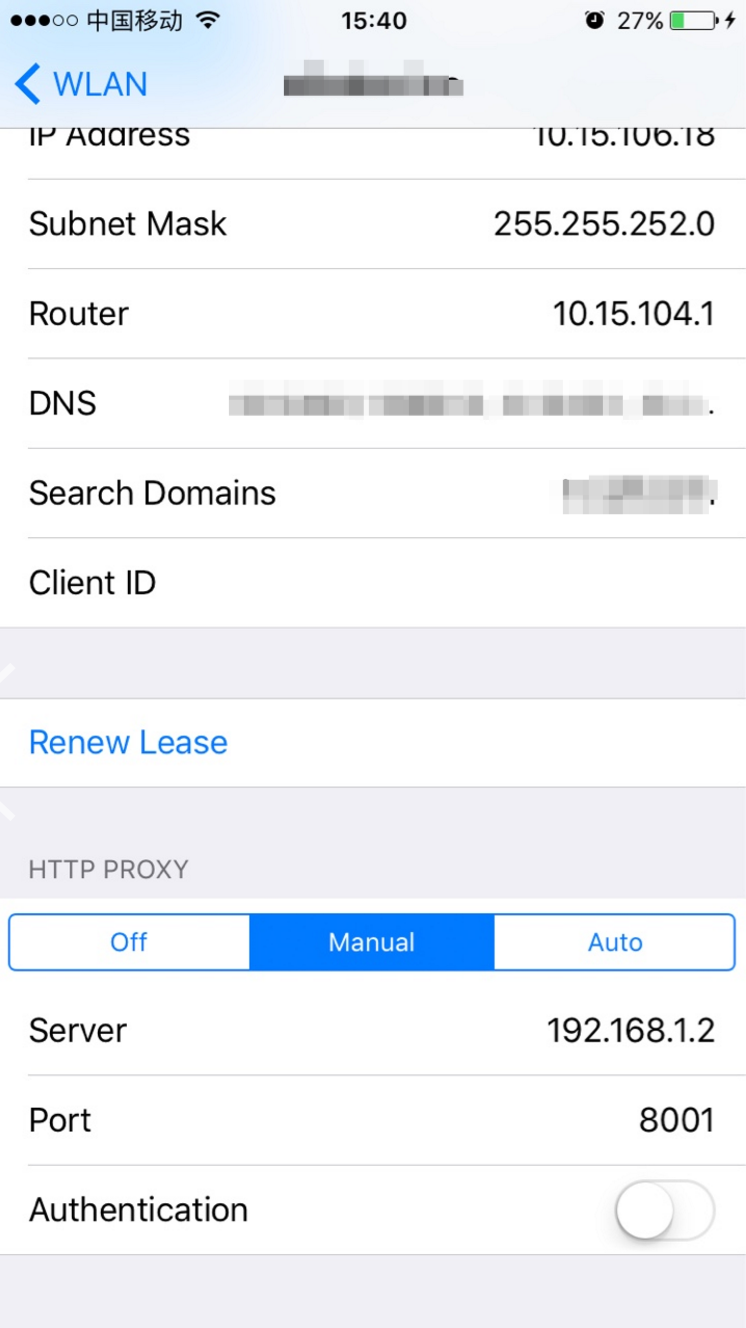
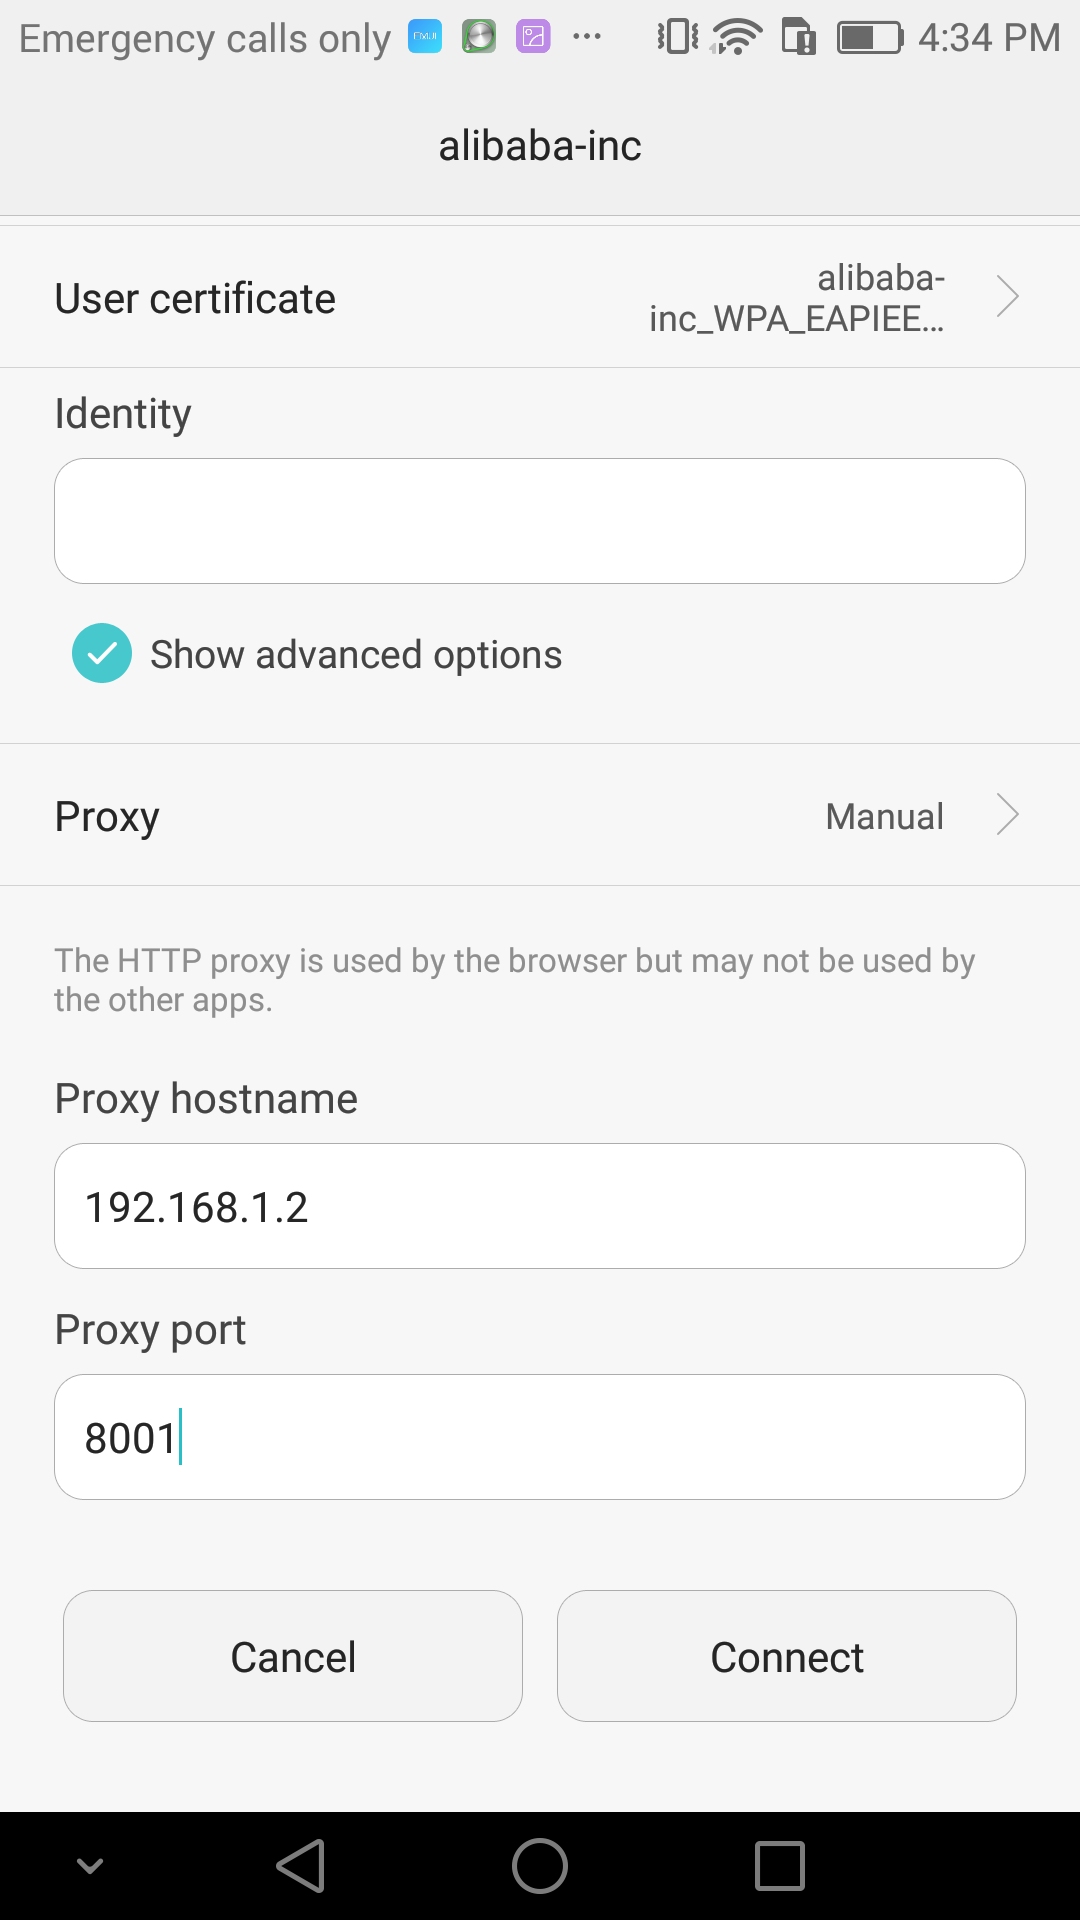
 ### 配置iOS/Android系统代理
* 代理服务器都在wifi设置中配置
* iOS HTTP代理配置
### 配置iOS/Android系统代理
* 代理服务器都在wifi设置中配置
* iOS HTTP代理配置
 * Android HTTP代理配置
 # FAQ
#### Q: 为什么https请求不能进入处理函数?
A: 以下任意一项都能用来改变https的处理特性:
1. 命令行启动AnyProxy时配置`--intercept`参数,按npm模块启动时配置`forceProxyHttps`参数,所有Https请求都会被替换证书并解析
2. 规则文件内提供`beforeDealHttpsRequest`方法,返回 *true* 的https请求会被解析
#### Q: 提示 *function is not yieldable*
* A: 规则模块是用 [co](https://www.npmjs.com/package/co) 驱动的,函数需要满足yieldable。可以使用generator方法或是返回Promise。
#### Q: The connection is not private
当访问特定的HTTPS站点,AnyProxy会提示该站点不是一个安全的网站,这通常是因为站点的证书设置不能被正确识别导致的(比如,站点的证书是自签发的)。如果您信任该网站,可以用以下方式来继续访问:
- 命令行直接启动
通过启动参数 `--ignore-unauthorized-ssl` 来忽略证书认证的错误。需要注意的是,该参数是全局生效的,如果你在此期间访问了其他未知的网站,他们的证书问题也会被忽略,这可能会带来安全隐患。
```bash
anyproxy -i --ignore-unauthorized-ssl
```
- 在Nodejs代码中启动
在构造AnyProxy实例的时候,传入参数`dangerouslyIgnoreUnauthorized:true`, 如下:
```js
const options = {
...,
dangerouslyIgnoreUnauthorized: true
};
const anyproxyIns = new AnyProxy.ProxyCore(options);
anyproxyIns.start();
```
*通过这种方式初始化的AnyProxy,其配置也是全局性的,所有网站的证书问题都会被忽略*
- 通过自定义的Rule来修改
我们自然也可以借助自定义的Rule来实现这个效果,而且我们还可以控制到只允许指定网址的证书错误,对不在列表的网址,进行证书的强验证。
```js
module.exports = {
*beforeSendRequest(requestDetail) {
if (requestDetail.url.indexOf('https://the-site-you-know.com') === 0) {
const newRequestOptions = requestDetail.requestOptions;
// 设置属性 rejectUnauthorized 为 false
newRequestOptions.rejectUnauthorized = false;
return {
requestOptions: newRequestOptions
};
}
},
};
```
# FAQ
#### Q: 为什么https请求不能进入处理函数?
A: 以下任意一项都能用来改变https的处理特性:
1. 命令行启动AnyProxy时配置`--intercept`参数,按npm模块启动时配置`forceProxyHttps`参数,所有Https请求都会被替换证书并解析
2. 规则文件内提供`beforeDealHttpsRequest`方法,返回 *true* 的https请求会被解析
#### Q: 提示 *function is not yieldable*
* A: 规则模块是用 [co](https://www.npmjs.com/package/co) 驱动的,函数需要满足yieldable。可以使用generator方法或是返回Promise。
#### Q: The connection is not private
当访问特定的HTTPS站点,AnyProxy会提示该站点不是一个安全的网站,这通常是因为站点的证书设置不能被正确识别导致的(比如,站点的证书是自签发的)。如果您信任该网站,可以用以下方式来继续访问:
- 命令行直接启动
通过启动参数 `--ignore-unauthorized-ssl` 来忽略证书认证的错误。需要注意的是,该参数是全局生效的,如果你在此期间访问了其他未知的网站,他们的证书问题也会被忽略,这可能会带来安全隐患。
```bash
anyproxy -i --ignore-unauthorized-ssl
```
- 在Nodejs代码中启动
在构造AnyProxy实例的时候,传入参数`dangerouslyIgnoreUnauthorized:true`, 如下:
```js
const options = {
...,
dangerouslyIgnoreUnauthorized: true
};
const anyproxyIns = new AnyProxy.ProxyCore(options);
anyproxyIns.start();
```
*通过这种方式初始化的AnyProxy,其配置也是全局性的,所有网站的证书问题都会被忽略*
- 通过自定义的Rule来修改
我们自然也可以借助自定义的Rule来实现这个效果,而且我们还可以控制到只允许指定网址的证书错误,对不在列表的网址,进行证书的强验证。
```js
module.exports = {
*beforeSendRequest(requestDetail) {
if (requestDetail.url.indexOf('https://the-site-you-know.com') === 0) {
const newRequestOptions = requestDetail.requestOptions;
// 设置属性 rejectUnauthorized 为 false
newRequestOptions.rejectUnauthorized = false;
return {
requestOptions: newRequestOptions
};
}
},
};
```